

Without further ado, I am back with a tutorial for the jewelry roll I put together last week! Just in the nick of time too, as were frantically trying to get ourselves packed and ready to leave for vacation next week. My mother in law is thrilled, as she gets to come stay at our house and spend an entire week with her "fur-grandbabies," yes thats right, our two dogs are in for a week of spoiling by grandma while we are gone.
I just keep thinking of "one more thing" I need to buy or pack, my list is getting a little outrageous at this point. Anyways, I'm really happy I decided to get this tutorial put together before leaving, as the second one turned out even better than the first, and I'm excited to fill it full of my jewelry and take it along to the beach!

Travel Jewelry Clutch
Finishes at appx 12" x 20" unrolled
What you will need:
(4) pieces of 4 gauge vinyl measuring 5" x 13"
(1) piece 4 gauge vinyl measuring 2" x 13"
(4) zippers at least 11" in length
(1) piece fabric for inner "see through" pockets measuring 12 x 22"
(1) piece fabric for zipper tabs measuring 2" x 12"
(1) piece fabric for outer cover measuring 12" x 22"
(2) pieces fusible fleece measuring 12" x 22"
(1) pack coordinating bias binding for edges (or 1 continuous piece bias binding measuring at least 70" long)
(2) pieces bias binding or ribbon for ties measuring appx 24" each
a few clothes pins or binder clips to hold the vinyl in place while sewing
**Throughout tutorial, the "dull" side of the vinyl is the right side, the "shiny" side of the vinyl is the wrong side.**
1. First we will fuse the fusible fleece to the wrong side of each piece of fabric measuring 12" x 22". Set aside
2. Next we will deal with our zippers. First, snip off the fabric "zipper tails" that extend beyond the zipper pull end when the zipper is closed. Next, lay your zipper along your cutting mat, with the zipper closed, and the pull end at 0" and measure down the length of the zipper 11". Make a small mark on each side of the zipper to show where to cut.
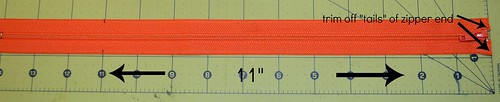
3. Cut the zipper along your marks from step 2. Your zipper should measure 11" long. Repeat steps 2 and 3 for the remaining 3 zippers.

4. We will next make the fabric "tabs" for the ends of the zipper. Take your 2" x 12" piece of fabric and fold in half lengthwise and press to mark the center. Open your fabric.

5. Fold raw edges lengthwise in towards the center line your made in step 4. Use a little spray starch if you have to get a nice crisp fold.
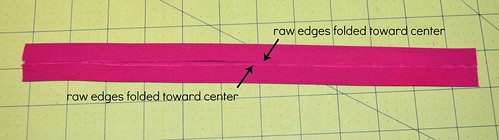
6. Now fold in half along the center line you made in step 4 to enclose the raw edges. Press. Cut lengthwise into (8) 1.5" pieces.

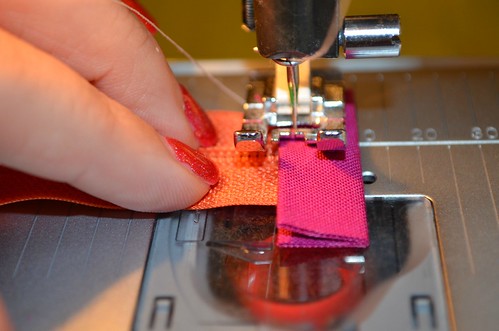
6. Next we will attach our zipper tabs to the zipper ends. I always start with the end away from the zipper pull. slide the zipper end in between the two open edges of your zipper tab. I just use my fingers to hold in place, and sew zipper tab onto zipper end using a 1/8" seam. Repeat for all 4 zippers.

7. Next open your zipper to sew the zipper tabs on to the other end. Again, slip the zipper in between the two open edges of your zipper tab. Again use your fingers to hold everything in place and the zipper "together", and sew with a 1/8" seam. Repeat for all 4 zippers.
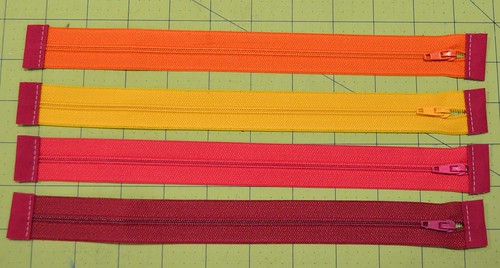
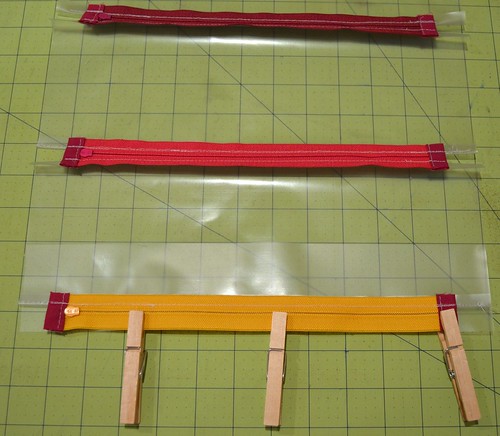
8. Your 4 zippers should now look like this:
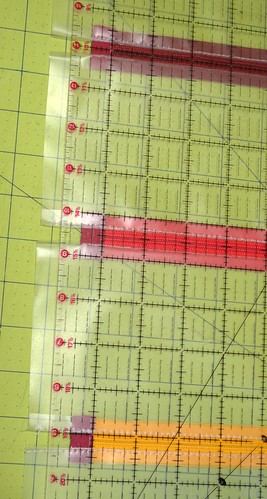
9. Next we will begin attaching our zippers to the 5" x 13" pieces of vinyl. This is where your binder clips or clothes pins will come in handy. Do not use pins as the pins will put holes in the vinyl!! Place one of your 5 x 13" pieces of vinyl with the right side (dull side) facing up. Next center your zipper along the long edge of the vinyl. You should have 1" of vinyl extending beyond the zipper on each edge. Make sure to align the zipper towards the left hand side. Use your binder clips or clothes pins to hold in place.

10. Attach zipper to the piece of vinyl using your zipper foot. Stitch as close to the zipper teeth as you can. Finger press the vinyl away from the zipper. Use a good amount of pressure and your finger nails to press. Do not use heat as the vinyl will melt!
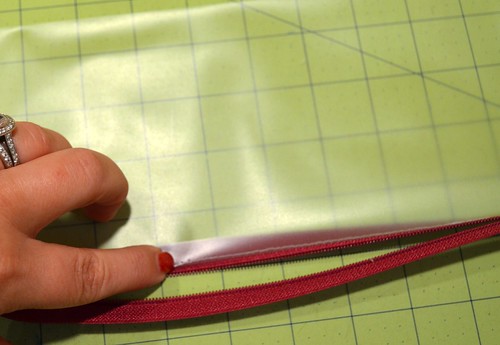
11. Top stitch to hold the vinyl in place. Begin backstitching at the very end of the vinyl. I try and top stitch as close to my original line of stitching from step 10, as it does show through the vinyl. Repeat steps 10 and 11 for remaining 3 zippers.

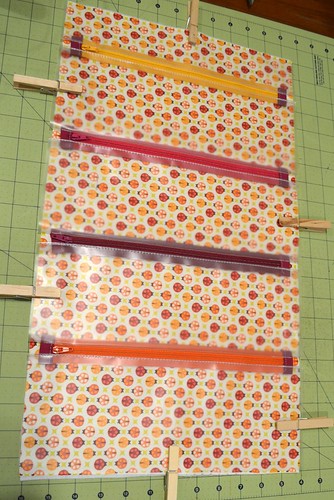
12. Next we will begin attaching our 4 zipper compartments. Choose two vinyl zipper pieces. Align one piece right side up with zipper away from you. Next align the second piece wrong side up with the zipper closest to you. Again making sure to center the zipper along the vinyl, so that 1" inch of vinyl extends beyond the zipper end. Repeat for remaining two zipper/ vinyl pieces.
13. Finger press vinyl away from the zipper. Do not top stitch yet.

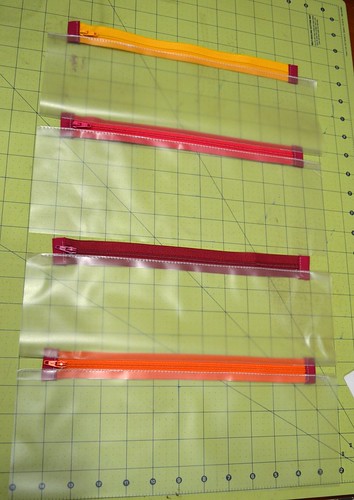
14. Repeat steps 12 and 13 to attach the two "zipper/vinyl/zipper/vinyl" pieces together. You should now have all (4) zippers and vinyl attached to one another.
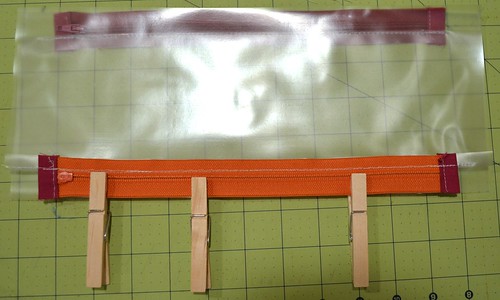
15. Next, take the 2" x 13" piece of vinyl, and we will attach it to the remaining exposed end of the top zipper using the method described in steps 9-11. Top stitch in place.

16. Breath a sigh of relief, you have successfully sewed with vinyl, and the tough part is over!
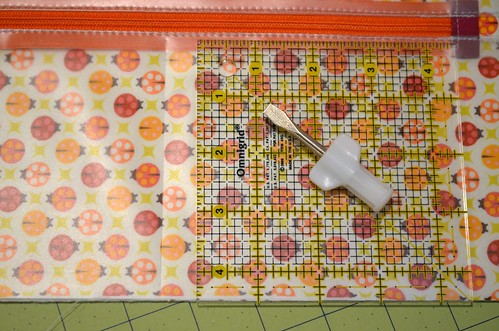
17. If everything lined up perfectly, you should have all your zippers perfectly in line, and exactly 1" of vinyl extending beyond both sides of all four zippers. Now since this is hardly ever the case (at least for me!) we left a little wiggle room to trim down the vinyl width so that it extends about 1/2" beyond the zipper tabs. If yours isn't lining up perfectly, thats ok, just do the best you can to square up your piece and trim each edge so that the vinyl extends appx 1/2" beyond the zipper pulls.
18. Take your 12" x 22" piece of fabric with fusible fleece attached to the back and lay on cutting mat right side up. Lay your vinyl/zipper piece right side up on top of your background fabric. Trim background fabric/vinyl if necessary. Use clothes pins/binder clips to hold in place.
20. Next we will stitch the vinyl/zippers to the background fabric to form the separations between the pockets. Stitch a line of stitching just above the bottom three zippers. This will serve as the top stitching to secure the vinyl in place and to make separations between the pockets. On the picture below, the black dashed lines represent where to sew.

21. I chose to sew dividers in the bottom pocket to give some separation. Can choose to do this or leave it as is, to do so, decide where you want your lines to be, to mark the line, I used a screwdriver, or a corner turning tool would do the trick to mark a faint line to mark where to sew. Don't press too hard, you don't want to puncture the vinyl. Sew along your marked line.
22. Lay your outer fabric with fusible fleece attached to the back right side down, and lay the vinyl/background fabric on top, right side up. Trim the outer fabric to the same size as the vinyl/background fabric. Use the clothes pins/binders clips to hold the two layers together.
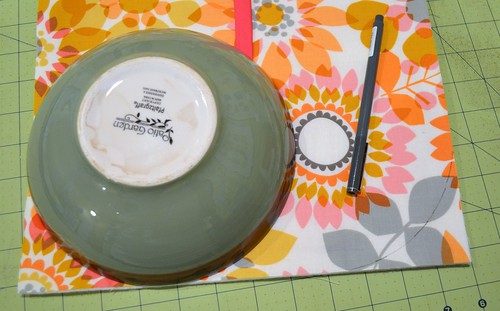
23. I chose to round my corners, you can round them if you like, or leave them square. If you want to round them, I used a cereal bowl and just rounded them to a size I liked. I chose to round the bottom corners more than the top.
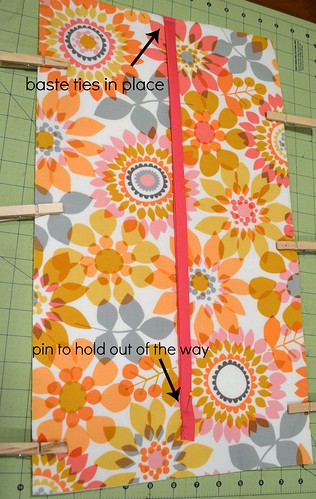
24. Cut two pieces of the ribbon/bias tape you wish to use as the ties to about 24" long. If you are using bias tape, be sure to sew a line of stitching to close the two folded edges. Layering one tie on top of the another, baste them to the center of the top short edge (edge with the 2" x 12" piece of vinyl) to hold in place. Since the ties are fairly long, I pinned them to the front to keep them out of the way like so:
25. Next we will attach our bias binding. Instead of reinventing the wheel, I'll refer you to this tutorial which does a great job at showing how to attach prepackaged bias tape. Tutorial can be found here. Once you attach the raw edge of the binding, I recommend trimming your seam to a scant 1/4" or so, because of the extra bulk from the fusible fleece it makes it difficult to fit around when stitch the backside down. You can also choose to hand sew the binding as you would on a quilt.

27. Fill your new jewelry roll with all your pretty jewelry and admire!
20. Next we will stitch the vinyl/zippers to the background fabric to form the separations between the pockets. Stitch a line of stitching just above the bottom three zippers. This will serve as the top stitching to secure the vinyl in place and to make separations between the pockets. On the picture below, the black dashed lines represent where to sew.
21. I chose to sew dividers in the bottom pocket to give some separation. Can choose to do this or leave it as is, to do so, decide where you want your lines to be, to mark the line, I used a screwdriver, or a corner turning tool would do the trick to mark a faint line to mark where to sew. Don't press too hard, you don't want to puncture the vinyl. Sew along your marked line.
22. Lay your outer fabric with fusible fleece attached to the back right side down, and lay the vinyl/background fabric on top, right side up. Trim the outer fabric to the same size as the vinyl/background fabric. Use the clothes pins/binders clips to hold the two layers together.
23. I chose to round my corners, you can round them if you like, or leave them square. If you want to round them, I used a cereal bowl and just rounded them to a size I liked. I chose to round the bottom corners more than the top.
25. Next we will attach our bias binding. Instead of reinventing the wheel, I'll refer you to this tutorial which does a great job at showing how to attach prepackaged bias tape. Tutorial can be found here. Once you attach the raw edge of the binding, I recommend trimming your seam to a scant 1/4" or so, because of the extra bulk from the fusible fleece it makes it difficult to fit around when stitch the backside down. You can also choose to hand sew the binding as you would on a quilt.
27. Fill your new jewelry roll with all your pretty jewelry and admire!

Thanks for stitching along, if you make a travel jewelry clutch, I'd love to see it! Be sure to add it to the SewCraftyJess flickr group.
This is great. The ones at Target always look so cheaply made and are all black or something like cheetah print. Excited to make one to coordinate with my luggage in a fun fabric!
ReplyDeleteThis is such a great tutorial! Pinning it so I can make it one day!
ReplyDeleteOooooh I will certainly be making this soon! And it would make a great Christmas gift, too!
ReplyDeleteCompletely fabulous - thanks for this, Jess! Melissa has a great point - these would make awesome Christmas or Teachers' gifts!
ReplyDeleteThis is so awesome! I need to make one to organize all the junk in my purse
ReplyDeleteThis is lovely! You explained it really well and it could have so many uses. Another thing to add to my ever growing 'to make' list. There aren't enough hours in the day!
ReplyDeleteKaty
The moment I've been waiting for! Thanks for this tutorial...I hope to try it soon!
ReplyDeleteI particularly like the 'breath a sigh of relief' step ;o) I definitely need to give this a go!
ReplyDeleteYay!! Thanks so much for the tutorial! Can't wait to go buy some vinyl and zippers to make my own :-)
ReplyDeleteAmanda
Great tutorial as always. Planning on making two of them for Christmas gifts for my girls. Thanks for sharing your amazing talents with us.
ReplyDeleteI really like this! I need to make one. Thanks for sharing your beautifully crafted project!
ReplyDeleteYes!! I am so glad you wrote a tutorial for this and decided to share it with us-- I fell in love this this as soon as you posted about it, and I really want to make one! I also love your fabric choices here, this looks great! Thanks so much for taking the time to share all the details!
ReplyDeleteThis is wonderful! I bought everything I need to make one of these before my vacation in November. Thanks so much for sharing this tutorial.
ReplyDeleteWow! Fantastic tutorial, thanks so much for sharing!
ReplyDeleteGreat tutorial ... I totally need to make one of these! Thanks :)
ReplyDeleteLove, love ,love all your creations!! Beautiful!!! Miss you--be well!
ReplyDeletePatty T
I used your directions, with some slight modifications, to make a case to hold all of my cords and chargers when I travel. You can see the finished product at: http://artquiltmaker.com/blog/2012/10/finished-charger-case/
ReplyDeleteThanks for sharing!
Jaye
http://artquiltmaker.com/blog
I recently made one of these for my son's fiancee as a graduation gift (as well as a few more travel accessories I found online). My question is how do you tie it up? I tried tying the ties in a bow, but one was much longer than the other after wrapping. I can't tell from your picture how you have it closed? I ended up chopping one of them off to make it more even when tied in a bow. She LOVED the bag, and I enjoyed a well-written tutorial to go by! Thanks so much!
ReplyDeleteThis is an excellent tutorial. I have looked for one like this and finally I found it! Thank you so much! Your instructions are complete and easy to understand.
ReplyDeleteThe pictures are no longer available?
ReplyDelete