
Hello bloggy friends! I am ashamed that its been almost three weeks since we've met! I can assure you that its certainly not because I've been sitting with my feet up watching bad reality TV...well, ok there has been some of that going on, but it's mostly because we are in full on baby mode at casa Kelly, and working on things like organizing the linen closet, painting walls, painting trim, and painting things we didn't even know needed pained (with low VOC paint in well ventilated areas, I assure you!) with other not-so-fun baby/house prep tasks thrown in here and there that just don't make for good blogging.
I wish I had taken a before and after pic of the now nursery, as up until about 2 months ago the room was being used as a spare guest room, complete with a full size bed, extra furniture and lots of random crap (for lack of a better word) that there was no room for anywhere else in the house.
I did find this Instagram picture I snapped of the baby's closet before it was cleaned out, so imagine this, times about a thousand for the amount of stuff that needed a new home in order to make room for baby.
Thankfully the end is near, and what was an old mis-mosh random spare room full of junk, is now a bright and airy cleaned out nursery, ready for all baby's things, and in a few short weeks, baby herself!
This weekend I made the trek out to our local Ikea, about 45 minutes away, as I knew I wanted an Expedit bookshelf for extra storage, with fabric bins to fit. Of course while I was there I found about a hundred dollars worth of things I had no idea I needed, but clearly needed to come home with me, but that's neither here nor there.

I knew I wanted the white 8 compartment Expedit, and was torn on the bin color. I liked the price of these fabric Drona bins, but the color selection left much to be desired. While they did have a yellow option, the "yellow" bin that was available was more of a mustard yellow, and that really didn't fit in with the yellow and grey color scheme we have going on in the little lady's nursery. I thought about getting pricier wicker ones, or plastic ones they had available, but wasn't sold on those options either. I settled on the white Drona bins, thinking that even though they were white, and were destined to be destroyed, they were only $5.99 a bin, so it wouldn't be a huge investment to replace them when that time came.
Once I finally made it home, I immediately put the book case together, and while I was immensely pleased with it, I couldn't get past the boring hum-drum white bins that were doing nothing for me. So I started Googling "bins to fit Expedit bookcase" to look for other options, and then inspiration struck! Silly me, with yards and yards of fabric downstairs, and a sewing machine to sew with, why not make covers for them!

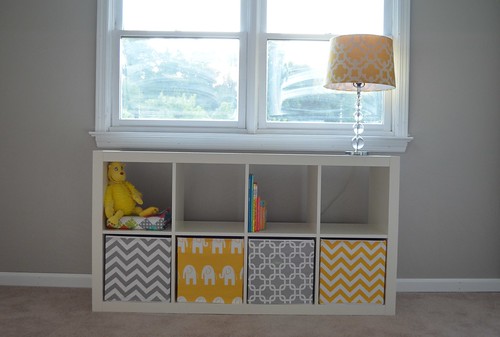
In no time at all my boring white Drona fabric bins were transformed into fun grey and yellow bins that match the colors in the nursery perfectly. I could not be more pleased with how these turned out, and for how easy and inexpensive they were to make, it will be a cinch to change them out on a whim.
Fabrics Used:
Premier Prints Ele Slub White/Yellow
Premier Prints Zig Zag Slub Yellow/White
Premier Prints ZigZag Twill Storm
Premier Prints Gotcha Twill Storm
In case you are interested in covering old bins you may be itching to change out, here's how I did it: (forgive my lack of pictures of the process)
1. Measure the circumference of the bin you are covering, this will be your length measurement (for the Drona bins, this was about 55.5") I chose not to add any seam allowance to this measurement, as I wanted a snug fit.
2. Measure the height of the bin (for the Drona bins the height was 12.5") and add 2" (total height was 14.5").
3. Cut fabric using measurement #1 as length and measurement #3 as height.
4. Along both long edges fold raw edges up .5" and press. Fold another .5" to enclose raw edges, press and top stitch both long edges in place.
5. Now we will attach the short edges to each other to make a continuous fabric tube. With right sides together, fold in half lengthwise (folded measurement should be 27.75" x 12.5" using Drona measurements). Pin short raw edges (12.5" edges) together and stitch using 1/2" seam allowance. Press seam open.
6. Turn the fabric "tube" right side facing out and slide your bin into the fabric tube, covering all four exposed sides of the bin.
Really its as simple as that, you don't even need pictures of the process! I promise it won't be 3 more weeks until my next post, but I can assure you it will likely be baby central in these parts, as were down to the last 8 weeks before our little lady is due to make her appearance! Stay tuned for more nursery themed posts to come :-)
It looks lovely!!! I can't believe you're only 8 weeks from your due date already, I hope you're feeling good!
ReplyDeleteThe shelves are beautiful. I love your aha moment description.
ReplyDeleteLove the new bins!
ReplyDeleteSuch a great idea to cover the bins in fabrics - love how fresh they look now!
ReplyDeleteThey look great!
ReplyDeletewhat a great idea! now we don't have to be restricted by the limited off-the-shelf options :)
ReplyDeleteThe bins look fabulous!!
ReplyDeleteWhat a great way to ensure that the furniture grows with the baby! You can swap it out whenever new inspiration strikes, or when they decide they love dinosaurs or cars or fairies or cats... there's just no limit! How exciting!
ReplyDeleteThis is super cute, and I love how you could change up the colour scheme of the room so easily!
ReplyDeleteWow, they look fabulous, great job! I love how well prepared you are, I was like that on my first. But poor R, no 3, is in her room 2 months now and I still haven't decorated it for her properly. Bad mum. Must get on that! Good luck for the rest of your pregnancy, hope you continue to be well. (As an aside, I have a similar problem when I go to IKEA)
ReplyDeleteI love the new bins! They look great in those fabrics and I love how easy it will be to switch up the look :)
ReplyDeleteWhat a difference! I read your how-to and will try it out. We have an Expedit, too, and also the fabric bins (in black). I wanted to cover the fronts with fabric but the your way is fantastic, too. I'll report when it will happen (it's on my never ending list now... ehem...)... Thanks.
ReplyDeleteThe bins do look so much better now that you have covered them in nice new fabrics! Well done!
ReplyDeleteLooks great. Using the fabric on the fronts made a big difference!
ReplyDeleteThis is so brillant! After looking at painting options, and fancy sewing options, this is so smart! THANK YOU!
ReplyDeleteIs this fabric thick enough that it could cover black drona bins?
ReplyDeleteI was wondering, if the length is 55.5" and the width of the fabric is 54" (as per the link), did you have to sew two pieces together to make the tube? Thanks!
ReplyDeleteSo, so happy that I found this page!I saw this pick on pintrest and never found it again. I am pinching your idea as I too am totally uninspired by Ikeas colour choices.
ReplyDeleteMany thanks